
How to create a floor plan
Describing your listing in words to potential buyers is one thing, but visually demonstrating what that means, could make the difference between a “no, not for me,” and a “looks great, I want to see more,” from your prospects.
Simply put, a floor plan is a two-dimensional drawing of a building to scale. It’s used to show the relationship between the various spaces on a single floor, giving an idea of the basic layout of the property. So you can see how the floor plan is a vital part of the listing process, and a powerful tool to fully demonstrate the size and features of the place. In addition, it will give potential buyers a better way to envision how they see themselves living in the place and making it their own.
Keep in mind, this is just a rough, simple drawing so I hope you don’t feel it’s a daunting task. You could easily create a do-it-yourself floor plan following the steps below.
The Pencil and Paper Method
What you’ll need:
- pencil and eraser
- paper
- a measuring tape or laser measure (investing in a cheap laser measure will save you so much time and won't require a second set of hands to hold the other end of the tape. They are available on amazon for less than £15).
The basics of drawing a floor plan
1). Measure your dimensions
While the scale doesn’t necessarily have to be super accurate for the purposes of your listing, it would be helpful for the buyer to get an idea of the different spaces. Knowing the exact measurements will also give you an idea of how to size the spaces in relation to each other, for example, clearly showing that say, a lounge is twice the size of the main bedroom. Although doing all the rooms in the house would be ideal, people are really interested in the main rooms like the kitchen, living room and bedrooms, usually to make sure their current bed or oversized TV and sofa will fit in the space. They are less fussed about the size of the downstairs loo, as long as you have a rough idea on your plan of its size you can get away with not measuring it.
Start by drawing the room you are in on your paper. The size doesn't matter too much at this stage, we will be redrawing a final version of it later, just make sure you leave enough space to draw the whole floor and write measurements on.
To measure a room, start by taking a measurement along the wall or skirting board of each of the walls, from one corner of the room to another. If you have a rectangular or square room you only need to measure 2 walls. If your room has lots of stepped walls or is a L shape you will need to measure all of them. Once you have measured the wall write it down on your drawing next to the corresponding wall. Try to use meters and cm to measure your space and don't get too hung up on my living room is 4m 5.5cm just call it 4m. On your final floor plan drawing you should include the words all sizes are approx and drawing is not to scale anyway, unless your drawing is super accurate and is to scale of course, in which case well done have a gold star for your efforts.
2). Account for fittings, door openings, and special features
You should make a note of where doors, windows and any other openings like archways are on your drawing, ideally we would measure the exact width of these openings and the distances between them, however this can be very time consuming and let's face it you have better things to be getting on with, so just note a rough size and position and make a note of which way doors open.
Buyers would also be interested to know where things like the kitchen sink, shower, or fireplace are located. A rule of thumb is to include anything that may help potential buyers to better visualise the space.
If this were a professionally drawn floor plan, these features would be indicated with the use of special symbols and terms, but to keep things easy to understand for both parties, you can simply say what these are alongside the drawing in plain English, just make sure you don't have too many words on the plan filling up the space, this could be a problem in rooms like the kitchen and bathrooms where you have a lot of fixtures.
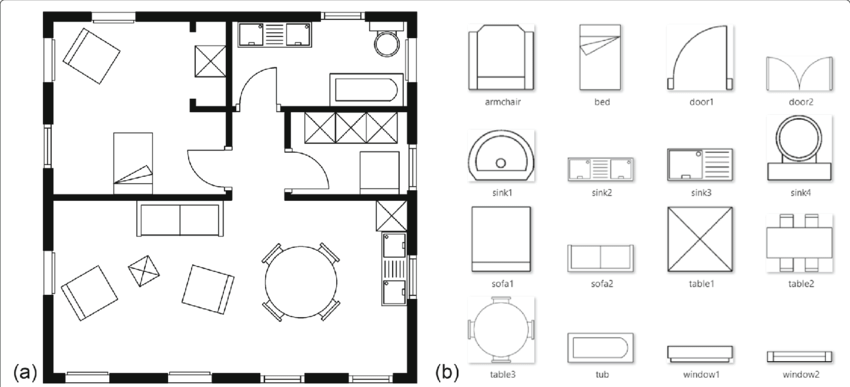
Below is an image of a basic floor plan and some of the basic and most common symbols, a quick online search will show you more.
3). Armed with your measurements and rough plan it's time to tidy it up and start drawing.
Now you have done the hard work, measuring the wall behind the sofa and getting bitten by your tape measure when you forgot how fast the recall is, it’s time to tidy up your plan and make it look professional.
For this step you will need the rough sketch with your measurements, a trusty pencil and his friend the sharpener, a ruler and a glass of wine.
Once you have all these items we can transfer your rough sketch into a proper professional floor plan, using your ruler draw out your first room, if you are trying to do a scale or close to scale drawing decide on your scale now and make sure your paper is large enough, and more importantly will fit in the scanner later. Scaling a drawing roughly isn't that hard. For example you may decide that 3m is equal to 12cm, this means that 1m is equal to 3cm, a scale of 1:33. The trick to scaling is to make sure it will fit on the page, and you have enough room for your labeling. Using a 1m to 1cm scale would be far too small for your labels and 1m to 10cm might make it too big for A4 paper.
Right, you have a scale box of your living room now what? It's time to add in those openings using the symbols above if you can draw in all the doors and windows and indicate which way the doors open. Then add in your dimensions do this by writing the size along the wall. Finally write what room it is in the middle of your box.
Now it's time to do the next room, repeat the process until you have the entire floor of your house, then get a new sheet of paper and repeat for each additional floor in your house.
Once you have all of your sheets you will need to scan them into your computer or take a photo of them to upload to your listing, if you are taking a photo try to make sure there are no shadows or light spots on the image, and that there is nothing around the paper, ideally you want it to look like a scanned image.
Using PowerPoint or Keynote:
Now let's talk about a digital way to create a floor plan, using a program like powerpoint or keynote can make your life easier when creating your floor plan, firstly there is no need to scan your image, and you don't need to worry about running out of space on your paper, handwriting or making mistakes. Another advantage is you can import icons like the doors and windows or cookers and showers.
Lets begin:
1. Open up a blank PowerPoint presentation
2. Go to the ‘Insert’ dropdown in the top left corner and select ‘Shapes’. Now select the
rectangle and click on the blank slide for it to appear.
3. Select and drag the corner cursors in order to increase the size of the rectangle.
Preferably to the full size of the slide.
4. Right click to select ‘Format Shape’ from the options then click ‘Fill’ and select the
‘No Fill’ option. Now consider this empty rectangle your empty floor plan.
5. To start adding rooms to the plan you can pretty much follow the above steps again,
only plotting your shapes according to the size and position of the rooms. It’s your
home so you should have a good idea of what goes where.
6. Because your plan won’t be 100% accurate, it’s important to give potential buyers a
clear indication of the size of each of the spaces. Simply insert a text box in the
respective shapes. You can do this by toggling ‘Insert’ then selecting ‘Text box’. Now
click on the space in which you want to add it.
7. Label your shapes with very simple descriptions, e.g. Master Bedroom. xm x xm.
8. You can use the same simple method to indicate doors and windows. Remember,
this is not a design challenge, it’s really just a demonstration of the space in its most
basic, necessary form.
9. Depending on the level of detail you want to go into you can choose to insert icons to represent things like showers and cookers or sinks.
There you have it. Drawing a floor plan really doesn’t have to be a daunting task. If you
follow the basics and make sure you’re demonstrating the most important parts of the
property, then you should be good to go.
Selling your property on your own can seem like a hard win, but if you market your listing in
the best way possible, it can be a lot easier than you think! Coupled with alluring
descriptions and captivating images, a floor plan of your property may just take you from
“for sale” to “sold” in no time.
Leave a Comment /

Vencasa Ltd, Fulford House, Newbold Terrace,
Leamington Spa, Warwickshire, CV32 4EA
0 Comments